Far from hum-drum, it was the "awesome" experience of AA weapons employment.
Got some DCS time again last evening, plus I had to give my eyes a rest after the previously described extravaganzas. I printed out the few pages from the manual relevant to radar and IRST employment and kept them on hand. With more intent to get some practice with the detection and target acquisition sensors than to actually fight on my third SU-33 sortie, I set up an ME with some "drones". Here are the protagonists.
I included an F-5E Freedom Fighter aggressor on patrol and an A-10C on a mission coming in from the north to bomb Kobuleti (the only armed aircraft in the scenario). With the latter I unwittingly put some pressure on myself to utilize the sensors for their true purpose early on, at the time of my lowest experience level managing them. I also noticed that the L-39ZA is a very detailed model, wondering if there are plans to make this one flyable(?).
I went looking for the A-10C first, and initially searched for it passively while flying north to the intercept with the IRST in BVR mode. Did not detect anything, though I swept it through various azimuth and elevation settings, and figured I was using it all wrong and that it was probably a very short range sensor (there was a lot of pausing and re-reading, all the way through this session). I was later to prove to myself how wrong that assumption was. It is an excellent sensor, it is just that A-10's low IR signature keeps it quite safe.
However, I was eager to check out the "look down-shoot down" capability of the radar and switched the thing on in SCN BVR mode.
First thing was first; the A-10C was jamming with music (sounds like I'm describing a Bob Marley fan!). Though this effectively spoofed my HUD with multiple fake contacts, it also gave away the bearing to the A-10C. Had it not jammed, I may never have found it in time (A-10 drivers, please take note). I am going to take a moment here to list a few impressions and some confusions that were cleared up pretty quickly on actively utilizing the radar during these few minutes.
First, I am thrilled that you actually have to work quite hard with the radar to get a detection (on non-jamming targets, especially) and that everything is definitely not handed to you on a silver platter the moment you switch it on, as on old sims like the original Falcon. It is wonderful!
The HUD display of SCN BVR foxed me a bit, to start with. Basically, I was expecting to be able to extract azimuth and elevation reference (boresight style) from the HUD and azimuth and range from the HDD. Not so. In changing the range scale on the HDD, I was noticing contacts were moving up and down on the HUD, too, mimicking the HDD. Both displays give you azimuth and range reference in BVR mode. Determining the elevation is up to you.
It is vital to use every available feature of the radar to detect contacts effectively, especially if in look down. Apart from the azimuth control, there is an elevation control, presented as a relative altitude setting, an expected range preset for the search, and a pulse repeat frequency setting to optimize detection of approaching or receding targets. The following shot best shows everything that I was wrestling and sweating with at this stage, including the opponents jamming (that A-10 was going for Kobuleti with dogged determination).

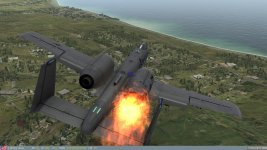
Figuring I may as well try, I hit the target lock, and at the short range (I had no idea how close I really and specifically was as a consequence of the A-10's music, and TWS mode seems to be pretty useless while being jammed), the radar burned through the ECM and locked. I was almost on top of the contact, about 15 clicks. It was a pretty good firing solution, so I released a single Alamo C (from what I have read previously, it was always PVO policy to release two missiles, a SARH and an IR, which is why they had both versions of the same missile as from the AA-3 Anab on the SU-15, but I had no IR solution as a result of switching off the IRST, so could not follow through). As the manual indicates, I turned away slightly while keeping the radar traverse within travel limits to reduce the closure rate on the contact. I immediately realized I had botched this; I had turned across the nose of a Sidewinder carrying A-10, into his own cone of engagement.

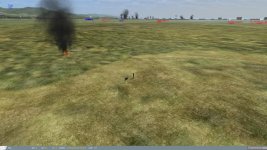
Lesson learned, and forgiven this time. The A-10 became much too engrossed in attempting to evade the Alamo to consider me, dumped his weapons (my mission was accomplished with this, whether the missile hit or not) and did not actually set up a very good evasion profile, climbing steeply and tracking obtuse to the incoming missile...
Though he got out, I reckon a visit to the burns medical unit was in order.
I went on to try out the IFF feature of the radar on the tanker, confirmed that there is no IFF for the IRST, and then generally used the IRST to detect the B-52, which was also doing its part jamming the radar.

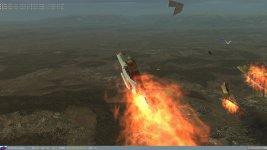
I got a weak IR signature form the B-52 and locked on. Unlike the radar, the passive IRST gives no range information while scanning, but after locking onto the B-52 it provided a range scale and revealed it had detected the aircraft at over 100 km. Impressive. While doing this excercise, switching between radar and IRST repeatedly, I suddenly got a RWR warning of an airborne radar, which could only be the F-5E coming to take vengeance for the A-10 loss. Remembering the recent lesson not to immediately start jamming, I went passive and scooted north until the radar warning ceased, then turned onto the last bearing of the warning with the IRST on. I soon locked onto the F-5E, which had lost heart, turned tail and was returning to its patrol area. He did not even know I was there and I got him with a Archer, with the boresight IRST mode, from spit-ball range. No chute from him this time, unfortunately. That IRST is something!

I played around a bit more with detections of the other contacts and then, considering that it had been a good training session, returned to the carrier. The vessel had passed a point in its path at which it turned and the 4 m/s wind down the deck was now a 3 m/s crosswind component from the right. One last challenge, then; carrier crosswind landing. I caught the three wire this time. Phew! Another hour and four minutes time in type.
I think it is obvious from this post; I was impressed to the point of being floored by the detail for AA sensor management in this sim. My sincere apologies for such enthusiasm! I do not think the results would be as positive once up against something with real teeth (ie; F-15C) to bite back with, though. In any case, I think this would be the last detail report from me on the Su-33, save perhaps a nowhere near as extensive mention of the campaigns. Thanks for your patience!


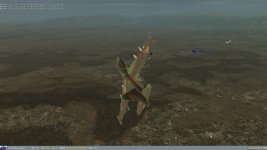
") , but the attempt to enter LEO failed at +23,000 m. I was wondering what the ITT's might be registering at this stage, thinking of a flame out, but WTF, look at those canards as it crested!
, but the attempt to enter LEO failed at +23,000 m. I was wondering what the ITT's might be registering at this stage, thinking of a flame out, but WTF, look at those canards as it crested! :
:


") Glad it is flyable, after all.
Glad it is flyable, after all.


